SupportFrequently Asked Questions
Frequently Asked Questions
Find answers to frequently asked questions about NAGAOKA products and services.
Digital Cameras
- MAF100 Won’t Power On / Cannot Charge
-
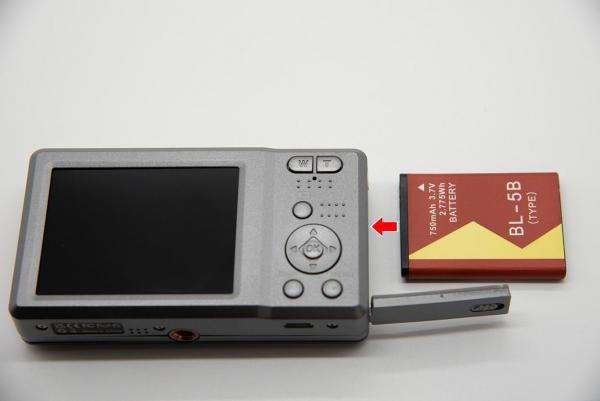
The battery can be inserted into the battery slot even when oriented incorrectly, so please check that the battery terminals are aligned with the terminals on the main unit. The correct insertion orientation is shown in the image below.
- MAF100 Date cannot be set
-
You can configure this via MENU→Settings→Date/Time Settings.
※This cannot be configured from the Date/Time Display item in MENU. - The MAF100 SD card won't fit
-
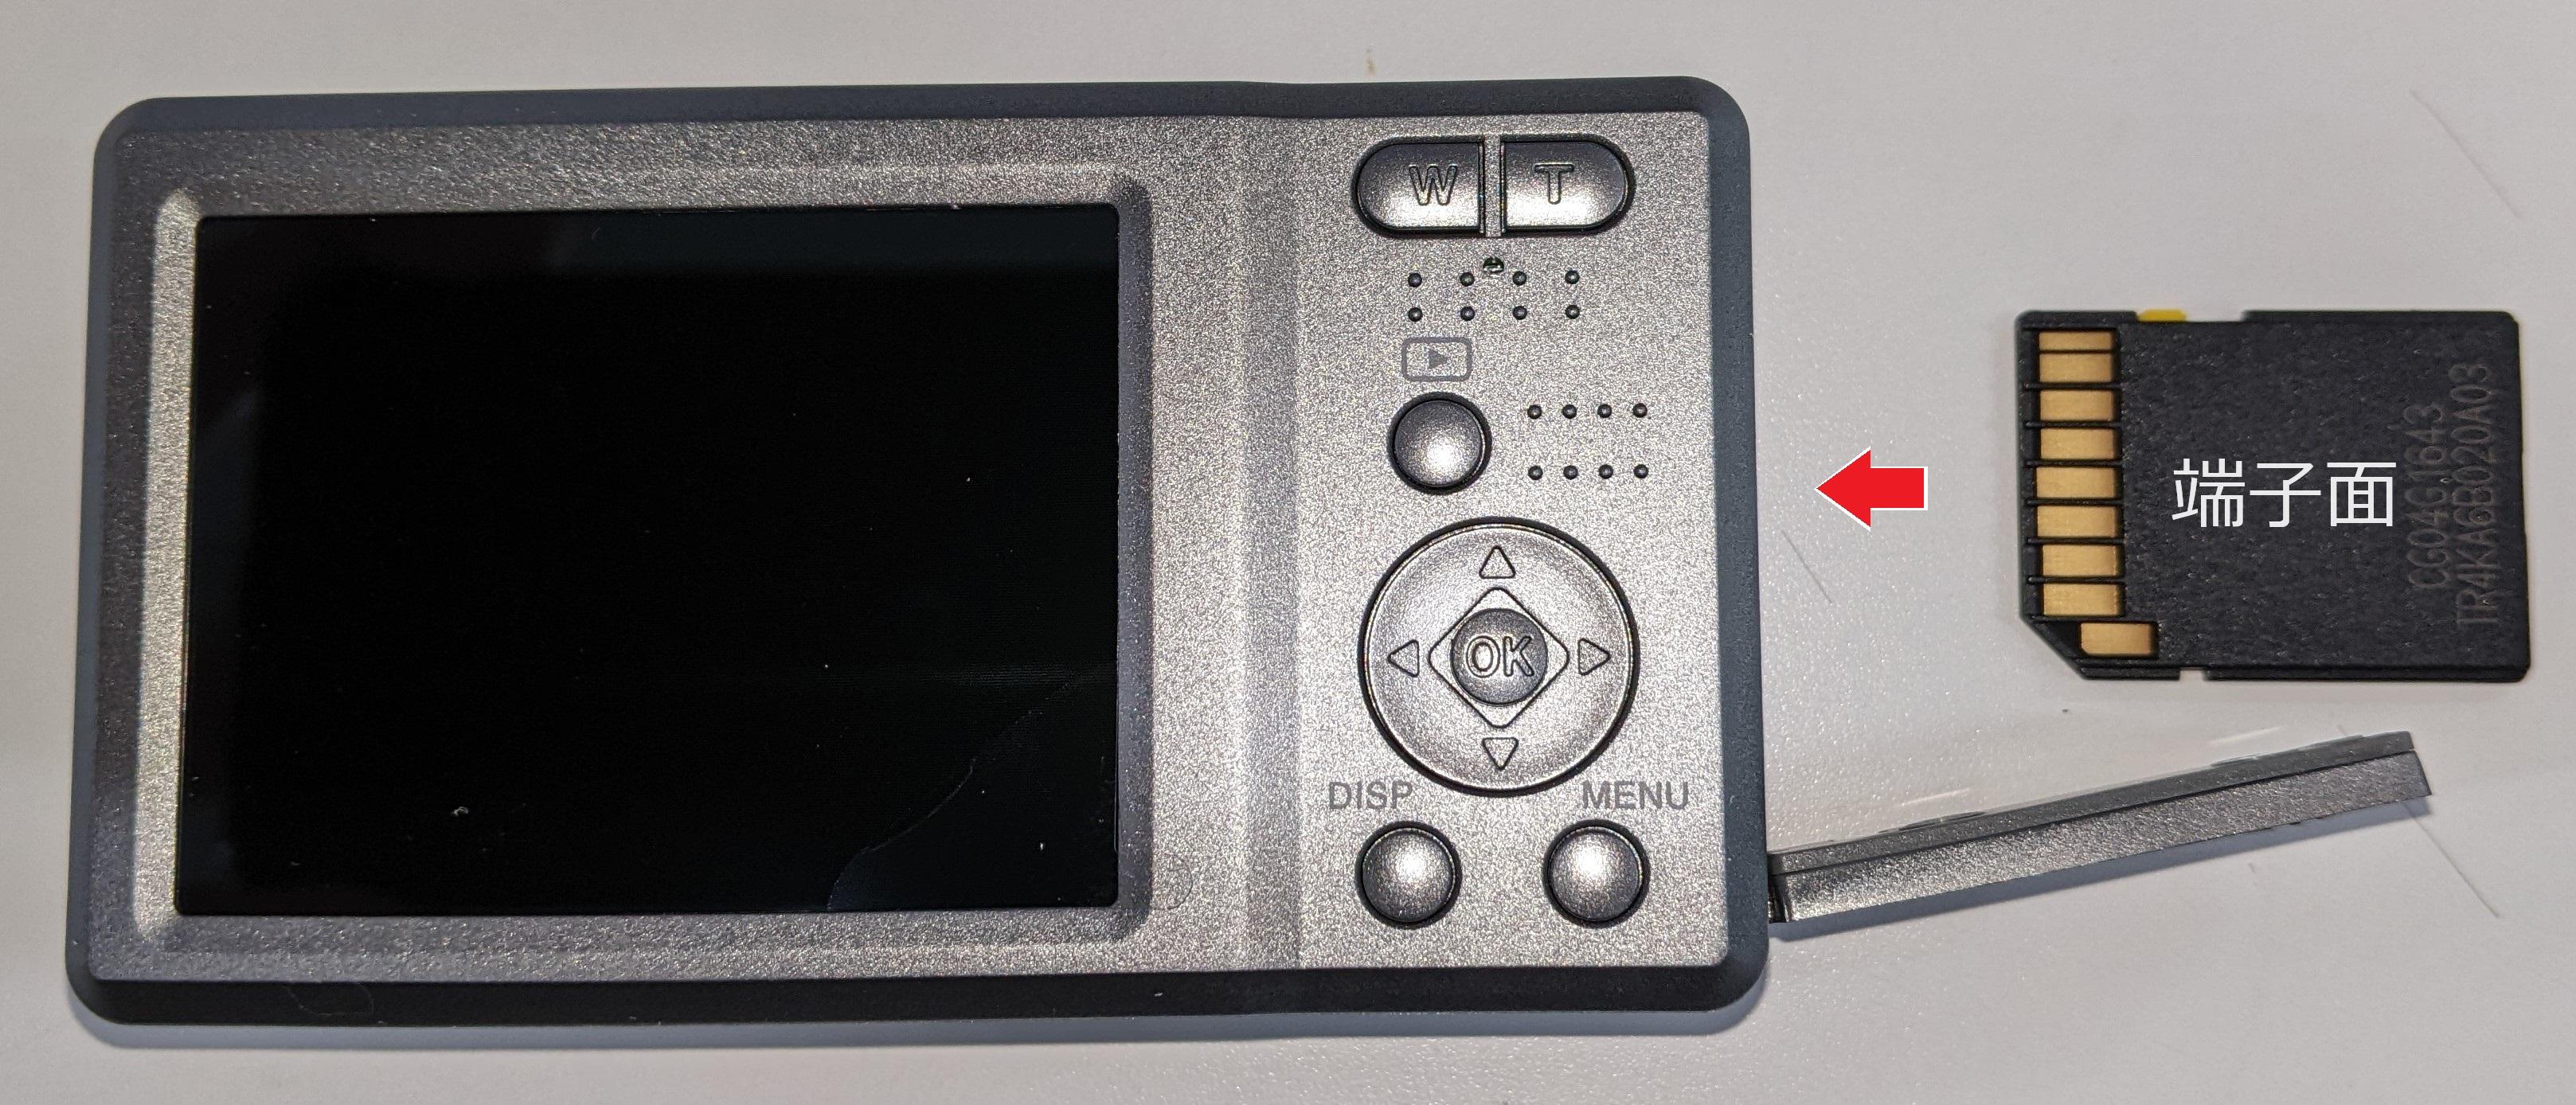
The correct insertion orientation is as shown in the image below.
Optical Discs
- Do you have lenses and head cleaners for MDs?
-
●All items have been discontinued. We sincerely apologize.
- What is a DVD/CD lens cleaner, and why use one?
-
●This cleans the reading lens on the player side.
Optical discs such as CDs and DVDs read disc information using a lens called a pickup lens installed in the player.
If this lens is dirty, it can cause reading errors, so use a lens cleaner regularly to remove dirt and prevent this.
※If reading errors are not resolved even after cleaning with the cleaner, another problem may have occurred, such as scratches on the lens or a malfunction of another device. Please contact the player manufacturer. - What is the difference between “wet” and “dry” lens cleaners?
-
●Use appropriately depending on the type of dirt to be removed.
Dry method: Removes dust and particles from the lens surface.
Wet method: Removes dirt containing oil from the lens surface using cleaning fluid.
Please use the appropriate method according to the purpose. - The DVD/CD lens cleaner cannot be played.
-
●The brush may be recognized as a foreign object.
With some high-end players, the brush attached to the disc may be recognized as a foreign object, preventing playback. - Can the cleaner be used with a SONY PlayStation®?
-
●In some cases, it may be necessary to use two types of cleaners separately: one for DVDs/CDs and one for Blu-ray.
For PlayStation®, some models are equipped with two pickup lenses, one for CDs/DVDs and one for Blu-ray, so it is necessary to use the CD/DVD cleaner and the two types of Blu-ray cleaner separately.
To improve symptoms with CDs/DVDs, use a CD/DVD lens cleaner; to improve symptoms with Blu-ray discs, use a Blu-ray lens cleaner.
For details, please contact the hardware manufacturer.
Our Lens Cleaner Lineup
■For CDs
Dry type: CDL-13
Wet type: CDL-14
■For DVDs
Dry type: DVL-802S/2
Wet type: DVL-802SW
■For Blu-ray
Dry type: BDL-01D
Wet type: BDL-02W
※PlayStation is a registered trademark or trademark of Sony Interactive Entertainment Inc. - Can a DVD/CD disc cleaning kit be used on Blu-ray discs?
-
●Use with Blu-ray discs is not recommended.
Blu-ray discs are more susceptible to surface scratches and are more delicate than CDs/DVDs.
Cleaning while high-hardness particles such as grains of sand or small fragments are attached to the surface may damage the surface.
Analog Audio
- Crackling noise is heard in the music
-
●Please clean the record.
Dust or dirt adhering to the record, or static electricity, can cause noise.
Spray record cleaning spray onto the record, then polish and clean the surface with Argento.
Products Used
■Clear Tone (SP-558)
■Statban (SP-562)
■Clean Up (SP-601)
■Argento (CL120)
※If there is a significant amount of dust or oily dirt, clean it using a label protector or similar product.
●Please clean the stylus tip.
Dirt adhering to the stylus tip can cause noise and may also damage the record.
Clean the stylus tip using Hi-Clean.
Products Used
■Hi-Clean (AM-801/2) - Frequent needle skipping occurs
-
●Please clean the record.
Dust or dirt adhering to the record can cause the stylus to skip.
Spray record-cleaning spray onto the record, then polish and clean the surface with Argento.
※If there is a substantial amount of dust or oily dirt, clean it using a label protector or similar product.
Products Used
■Clear Tone (SP-558)
■Statban (SP-562)
■Clean Up (SP-601)
■Argento (CL120)
●Please clean the stylus tip.
Dirt adhering to the stylus tip can cause the stylus to skip and may also damage the record.
Use Hi-Clean to clean the stylus tip.
Products Used
■Hi-Clean (AM-801/2)
●The stylus tip may be worn.
If the stylus tip has become worn and abraded through prolonged use, it can cause the stylus to skip and may also damage the record.
For diamond styli, replace the stylus regularly, using approximately 200 hours as a guideline.
●Is the tracking force adjusted correctly?
Most cartridges and replacement styli indicate the recommended tracking force.
If the tracking force differs from the specified recommended tracking force, it may cause the stylus to skip or other problems.
For adjustment instructions, please refer to the player’s manual.
●Is the anti-skating adjustment correct?
Anti-skating is a function that pulls the tonearm toward the outer edge of the record.
If this adjustment is incorrect, it may cause the stylus to skip or other problems.
For adjustment instructions, please refer to the player’s manual.
- The volume differs between the left and right sides, or sound does not come from one side.
-
[Introduction] Some songs and records may originally have different left and right volume levels due to recording, cutting, or other production processes.
● Please clean the stylus tip.
Dirt adhering to the stylus tip can cause poor tracking and may also damage the record.
Please use Hi-Clean to clean the stylus tip.
■Hi-Clean (AM-801/2)
● The stylus tip may be worn.
If the stylus tip has become worn and eroded through prolonged use, it can cause poor tracking and may also damage the record.
For diamond styli, replace the stylus regularly, using approximately 200 hours as a guideline.
● Are the lead wires securely connected?
If the lead wires (four copper wires) connecting the cartridge and headshell are not securely connected, poor contact may occur.
Using fine-tipped pliers or similar, insert them firmly all the way in, taking care not to damage the cartridge or lead wires.
● Is the headshell securely inserted into the tonearm? Is there any dust or other debris on the connection between the headshell and tonearm?
Poor contact may be occurring between the headshell and tonearm.
Check that no dust or other debris is adhering to the four contact points, and confirm that they are making secure contact.
● Is the overhang adjusted properly? Is tracking error occurring?
・Overhang: The distance from the turntable center to the stylus tip when the stylus tip is positioned over the turntable center.
・Tracking error adjustment: Poor tracking caused by the parallel relationship between the record groove and cartridge differing between the outer and inner grooves due to the cartridge's orientation.
Please make these adjustments using the jigs supplied with the turntable or commercially available jigs.
● Is the tonearm height adjusted properly?
Some turntables allow the height of the tonearm pivot to be adjusted.
For adjustment instructions, please refer to the turntable's manual. - The volume is too low or too high
-
●Is the phono equalizer set to match the type of cartridge you are using?
Because the output differs between MM (moving magnet) and MC (moving coil) types, you need to switch the setting on the phono equalizer or amplifier.
Please change the setting to match the type of cartridge you are using.
※When using our MP (moving permalloy) type, set it to MM.
- What length of player belt should I replace it with?
-
●Please check the length when folding the belt that was actually used in half.
Identify it based on the length when folding the rubber belt actually used in the player in half (1/2 of the circumference).
For example, if the length when folded in half is 29 cm, model number “B-29” is the compatible rubber belt.
※Rubber belts stretch due to wear from use and deterioration over time. Therefore, if the length is measured while the belt is stretched, the actually compatible rubber belt may be 1–2 sizes shorter. If deterioration makes it difficult to measure the length, thread something such as string through the route where the rubber belt was installed, tie it into a loop, and then remove it. Use the length of the string to identify the compatible rubber belt.
※If the belt is even slightly longer than the compatible belt, the motor or platter (the part that rotates while holding the record) may spin freely, or it may be impossible to install the rubber belt. Rubber belts stretch somewhat, so please be careful not to select a size that is too loose. - Is it possible to determine the length of the player belt from the player’s model number?
-
●We regret to inform you that we cannot identify the correct belt based on the player model number.
Identify it by the length of the rubber belt actually used in the player when folded in half (1/2 of the circumference).
For example, if the length when folded in half is 29 cm, model number "B-29" is the compatible rubber belt.
※Rubber belts stretch over time due to deterioration caused by use. Therefore, if the length is measured while the belt is stretched, the actually compatible rubber belt may be 1–2 sizes shorter. If deterioration makes it difficult to measure the length, thread something such as string through the path where the rubber belt was fitted, tie it into a loop, and then remove it. Use the length of the string to identify the compatible rubber belt,
※If the belt is even slightly longer than the compatible belt, the motor or platter (the part that holds and rotates the record) may spin freely, or the rubber belt may not be installable. Rubber belts stretch somewhat, so please take care not to select a size that is too loose. - I’d like to know how to clean a vinyl record.
-
●There are several cleaning methods, but we will introduce the two standard methods.
・Routine cleaning (before listening and before putting away)
①Spray a cleaning spray such as Clear Tone or Stat Ban onto the record.
②Wipe off the dirt along the grooves using Argento.
③Remove the dirt adhering to Argento with the brush at the tip of the case.
+α For cleaning before storage, CREAN UP (model number: SP-601), which contains an anti-mold ingredient, is recommended.
Products used
■Clear Tone (SP-558)
■Stat Ban (SP-562)
■CLEAN UP (SP-601)
■Argento (CL120)
・Cleaning heavily soiled records, records immediately after purchasing used records, etc.
①Protect the label with a label protector and wash it with water using a neutral detergent.
②After thoroughly rinsing off the neutral detergent, wipe off the water with a record cleaning cloth, then remove the protector.
③Using Clear Tone Water, remove impurities contained in tap water with Argento WET.
④Wipe off the Clear Tone Water with a cleaning cloth.
⑤Play the record blank at 45 rpm and scrape dirt from the grooves with the record stylus.
⑥Clean the dirt on the stylus tip used in the above procedure with Hi Clean.
Products used
■Label Protector (CLP02)
■Hi Clean (AM-801/2)
■Clear Tone Water Set (CTW-SET1)
※Clear Tone Water (SPW01)、Argento Wet (WCL111)、Record Cleaning Cloth (CLV30)are included in the set.
For details, please refer to the video below.
- Please explain the differences between the various record cleaning sprays.
-
●Clear Tone (SP-558)
This is a standard record-cleaning spray that combines cleaning and anti-static effects.
■Clear Tone (SP-558)
●Stat Ban (SP-562)
Like Clear Tone, it combines cleaning and anti-static effects.
Its anti-static effect is stronger than that of Clear Tone, so after spraying Stat Ban, the next 2–3 cleanings only need to be dry-wiped with Argento.
■Argento (CL120)
●Clean Up (SP-601)
In addition to cleaning and anti-static effects, it contains an anti-mold ingredient.
It is ideal for cleaning before storage.
■Clean Up (SP-601)
※After spraying any of these sprays, wipe-clean with Argento.
■Argento (CL120) - Can record spray be used on SP records, acetate records, and the like?
-
●Please note that it cannot be used.
Our record sprays (SP-558, SP-562, SP-601) are intended exclusively for LP/EP records (polyvinyl chloride).
SP records, acetate records, and similar media may be damaged because the record materials themselves differ.
Please do not use them on optical discs such as CDs, DVDs, and Blu-ray discs. - I want to know how to dispose of record spray
-
●Contains gas; dispose of it using the method below.
In an outdoor area away from flames, press the button until the hissing stops, and completely release the gas.
Dispose of the can according to your local government’s disposal procedures. - Mold has grown on the record.
-
●Depending on the condition, it may be impossible to remove it completely, but cleaning is possible using the methods below.
Please wash it with water using the Label Protector and Clear Tone Water Set, then perform several cleanings by playing it empty at 45 rpm and scraping mold out of the record grooves with the record stylus.
Please note that excessive cleaning may damage the record itself.
However, mold will recur if even a small amount remains, so once it has appeared, it is difficult to remove it completely.
Clean Up (SP-601) contains an anti-mold ingredient. Along with using this product, please manage the humidity of the storage location and adopt storage methods that prevent mold from developing in the first place.
※The ingredient formulated in Clean Up (SP-601) is an anti-mold ingredient; it is not an ingredient that removes mold once it has developed.
In addition, mold develops on the jacket covers and inner sleeves that housed records on which mold had previously developed. If you put a cleaned record back into that jacket or inner sleeve, mold will adhere to the record again, so never do so.
When replacing inner sleeves, please use the “Stat Disk File, 50 sleeves (RS-LP2),” which we sell.
■Stat Disk File, 50 sleeves (RS-LP2) - I would like to know the model number of the stylus that is compatible with the player.
-
●You can identify it from the model numbers of your player, cartridge, and genuine stylus.
Please provide the model numbers of your player, cartridge, and genuine stylus via the inquiry form. We will verify the information and provide guidance.
If you do not know the numbers, please indicate this via the inquiry form, then reply to our guidance email with photos of the stylus and cartridge sections in JPEG or another format. We will assist you as much as possible.
※If the file size is too large, the email may not be sent or received properly, so please send files of approximately 1 MB as a guideline.
※For a player whose cartridge has been replaced, identifying the replacement stylus from the player number may not match. In addition, if the player was sold in a cartridge-less format, or is a used or transferred player, the previous owner may have replaced the cartridge. Therefore, verification can be performed more accurately if the cartridge and genuine stylus have been identified. - What is a cartless player (cartridge-less player)?
-
●This is the term for a player that is shipped without a cartridge installed.
Some commercially available players have a headshell, genuine cartridge, and replacement stylus installed at the end of the tonearm; however, cartless (cartridge-less) players do not have these installed, and are intended for the purchaser to select and install a cartridge of their choice.
For cartless (cartridge-less) players, it may not be possible to identify a compatible replacement stylus from the player model number. Please provide the stylus number of the cartridge or genuine stylus.
Regarding compatibility when replacing the cartridge itself, most cartridges are secured to the headshell with two screws from above and connected with four lead wires, making them generally interchangeable, except for some products, such as those from which the cartridge cannot be removed.
※Please note that some cartridges have a structure in which the screws are inserted from below, while others have integrated bolts; since these cannot be secured due to their structure, replacing the headshell may be necessary. - I don't know which parts are the headshell, cartridge, and replacement stylus.
-
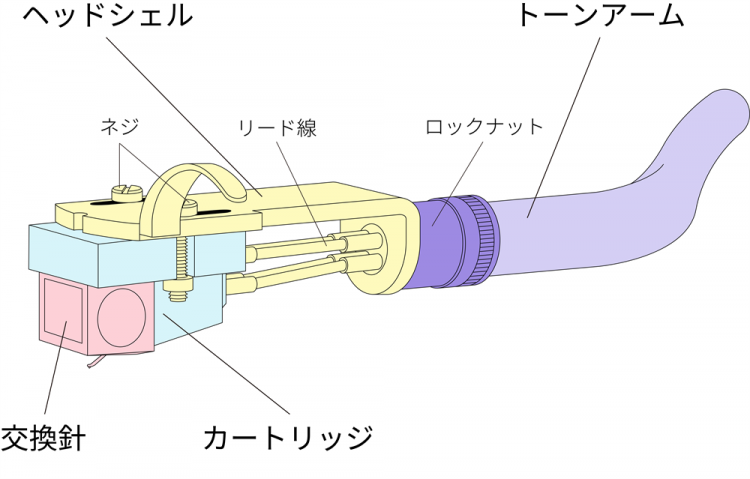
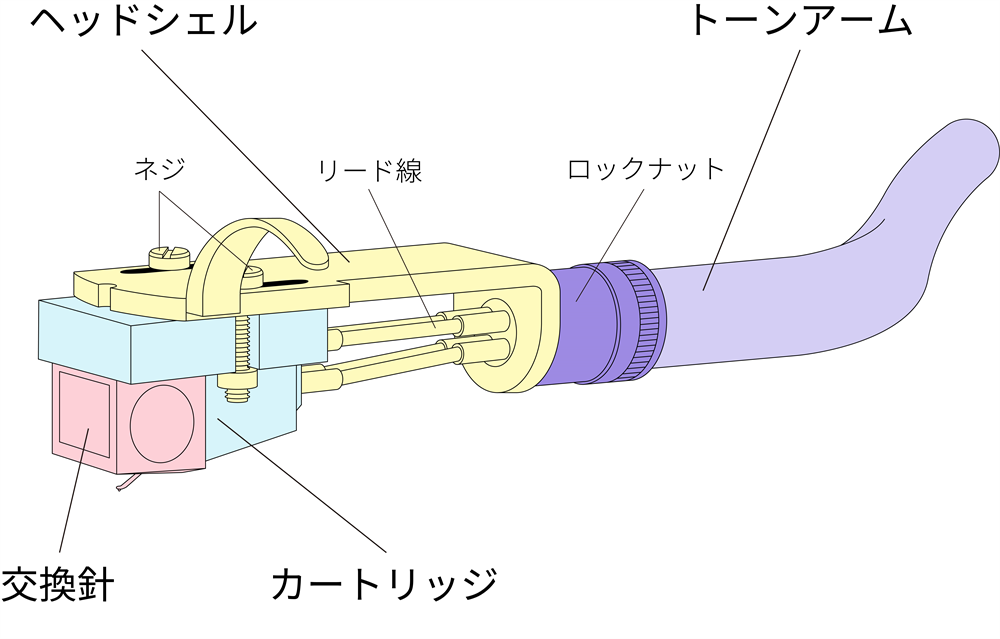
● A “headshell” is the component into which the cartridge and stylus are mounted, and which is inserted into the tonearm.
This is inserted into the tonearm and secured by turning the locking nut by hand, allowing attachment and removal without tools.
If the player has a removable headshell, a cartridge with a headshell can be easily replaced without securing it with screws using a screwdriver or wiring the lead wires with pliers.
※ Some players have an integrated headshell and tonearm.
● A “cartridge” is a box-shaped plastic or metal component to which the replacement stylus is attached.
It contains the stylus and a mechanism that generates electricity through the cartridge’s vibrations and converts those vibrations into electrical signals; it is used by inserting a replacement stylus.
Broadly speaking, there are types such as MM (moving magnet) and MC (moving coil).
It is secured to the headshell with two minus screws and connected by four lead wires. Except for some products where the cartridge cannot be removed, this installation method is common, so you can select and replace the cartridge you prefer based on sound quality and other factors.
※ Please note that some cartridges have a structure in which the screws are inserted from below, while others have integrated bolts; because they cannot be secured due to their structure, replacing the headshell may be necessary.
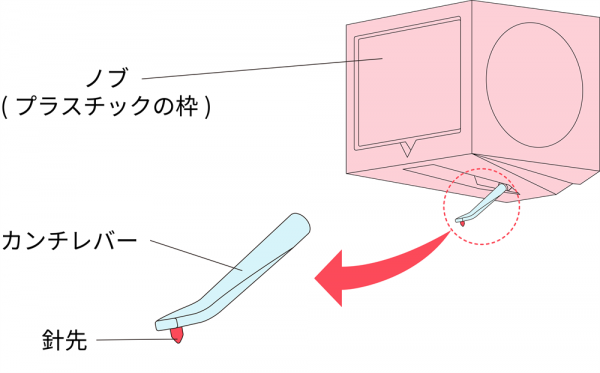
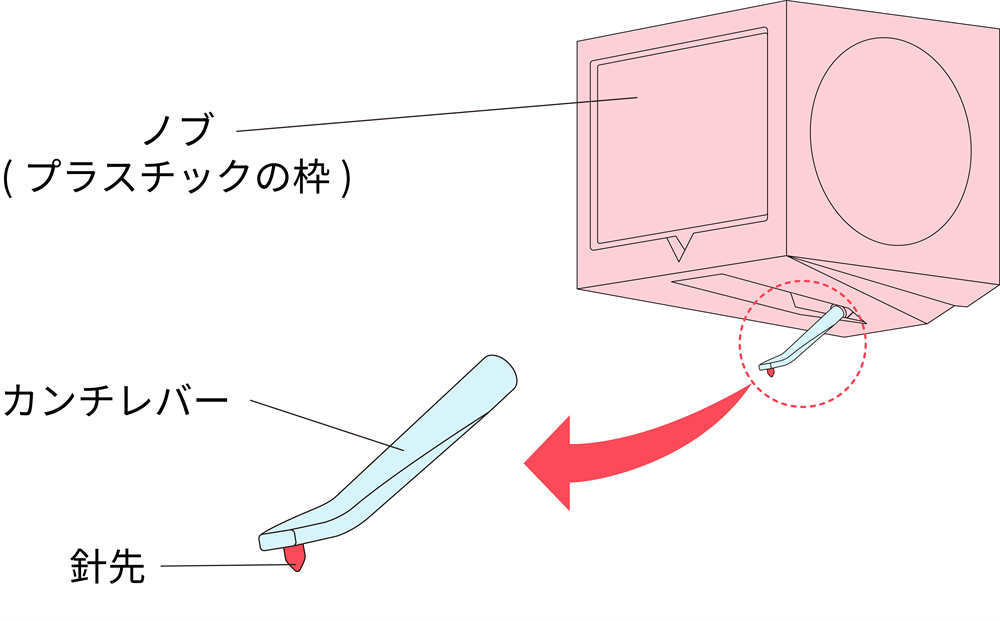
● A “replacement stylus” is the plastic component (knob) to which the stylus and cantilever are attached.
The plastic, frame-like component called the “knob,” which is secured and integrated with the cantilever (the silver-colored metal rod) to which the stylus is attached and the damper rubber, is referred to as the “replacement stylus.”
This is inserted into the cartridge and can be attached and removed by simply inserting and pulling it out, without tools. When replacing the stylus, remove and replace this component.
If you are unsure which part to remove, looking at the replacement stylus you have newly purchased should help you determine which part can be detached.
※ Please note that this is not removed and replaced by pulling on the cantilever (the silver-colored metal rod).
※ In the case of some cartridges, such as MC (moving coil) types, the cantilever and cartridge are connected by a coil and integrated, so the replacement stylus cannot be attached or removed.
Some players and cartridges also use a replacement stylus called a “ronette stylus.”
This type is used by securing the Y-shaped section with a screw.
- Is cleaning the needle tip necessary, and how should it be cleaned?
-
●Please use Nagaoka Hi-Clean (AM-801/2) for cleaning.
Dirt from the record grooves adheres to the stylus tip. If this dirt is left unattended, it can shorten the stylus’s service life and damage the record, so clean it regularly.
Use Hi-Clean (AM-801/2) to gently wipe dirt from the stylus tip with the brush, then remove the dirt from the brush using the cleaning solution.
■Hi-Clean (AM-801/2)
The pressure exerted by the stylus tip on the record, when converted to 1 cm³, amounts to several tons, and frictional heat raises the stylus tip to nearly 800°C (according to our measurements).
To prevent dust and dirt from baking onto the stylus tip as a result, keep the stylus tip clean at all times. - How long does a record stylus last?
-
●Although this varies depending on the usage environment, the approximate figures are as follows.
・Diamond stylus: Approximately 200 hours
・Sapphire stylus: Approximately 15 hours
Record needles gradually become worn and abrade with use.
Using a worn record needle may cause skipping and poor tracking, as well as damage to records; therefore, regular stylus replacement is recommended. - Please tell me how to adjust the tracking force.
-
●This varies by player, so please refer to the player’s instruction manual or contact the player’s manufacturer.
With most players, this is done by adjusting the front-to-back position of the balance weight (counterweight) mounted on the side of the tonearm opposite the cartridge. First set it to zero balance (the state in which the tonearm is level with the cartridge and replacement stylus installed), then adjust the tracking force to the value specified for each stylus and cartridge.
Normally, use the graduations on the balance weight as a reference or use a tracking force gauge.
- Please explain the difference between Nagaoka’s MP (Moving Permalloy) cartridges and MM (Moving Magnet) cartridges.
-
●The difference is in the power generation method. Nagaoka’s MP (Moving Permalloy) cartridges can be used in the same way as MM (Moving Magnet) types.
MM (Moving Magnet) types have a magnet attached to the back (base) of the cantilever. Its movement generates electricity using coils attached to the cartridge body, converts it into an electrical signal, and sends it to the amplifier.
In contrast, MP (Moving Permalloy) cartridges use a light alloy called permalloy wrapped around the back (base) of the cantilever instead of a magnet, and magnetize it with the magnet in the body. Compared with MM types, this provides greater freedom of movement for the cantilever, enabling more delicate tracing of the sound grooves.
MP cartridges have an output comparable to that of MM types, so they can be used in the same way as MM types.
If the phono equalizer or amplifier has an MM/MC selector switch, select “MM” when using it. - Production of the replacement stylus has ended. What should I do?
-
●Even if the manufacturer’s genuine stylus is no longer in production, we may have a compatible stylus that can be used with your equipment.
Please provide the model numbers of the player, cartridge, and genuine stylus via the inquiry form. We will verify the information and provide guidance.
If you do not know the numbers, please indicate this via the inquiry form, then reply to the guidance email from us with photos of the stylus and cartridge sections in JPEG or another format. We will do our best to assist you.
※If the file size is too large, emails may not be sent or received properly, so please send files of approximately 1 MB as a guideline.
※For a player whose cartridge has been replaced, identifying the replacement stylus from the player number may not always produce a match. In addition, if the player was sold without a cartridge, or is a used or transferred item, the previous owner may have replaced the cartridge. Therefore, verification can be performed more accurately if the cartridge and genuine stylus can be identified.
●Even if we have also discontinued production of compatible styli, the player can continue to be used by replacing the cartridge.
Our MP cartridges and JT-80 series cartridges can be used.
With regard to cartridge replacement, most cartridges are secured from above the headshell with two screws and connected with four lead wires; this structure is generally common, except for some products from which the cartridge cannot be removed.
※Please note that some cartridges have a structure in which the screws are inserted from below, while others have integrated bolts. Since these cannot be secured due to their structure, replacing the headshell may be necessary.
If the player has a removable headshell, a cartridge with a headshell can be easily replaced without securing screws with a screwdriver or wiring the lead wires with pliers.
(Our cartridges with headshells are those with an “H” appended to the end of the MP series cartridge model number. Example: MP-100H)
For players using the plug-in “T-4P” cartridge (P-mount), please use “C-502M/P”. - Please tell me which cartridges are compatible with the player.
-
●Most cartridges are compatible with one another (standard mount).
Cartridge replacement generally involves securing the cartridge to the headshell with two screws from above and connecting it with four lead wires. This design is common, except for some products where the cartridge cannot be removed.
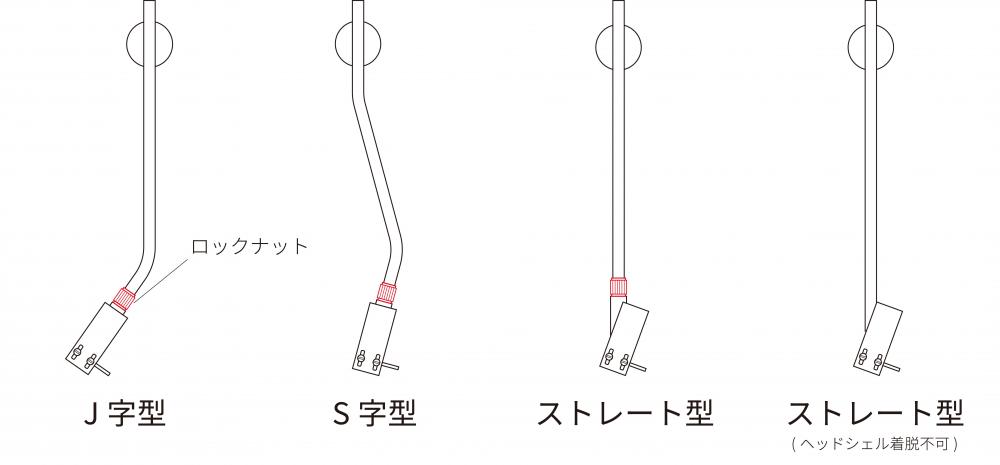
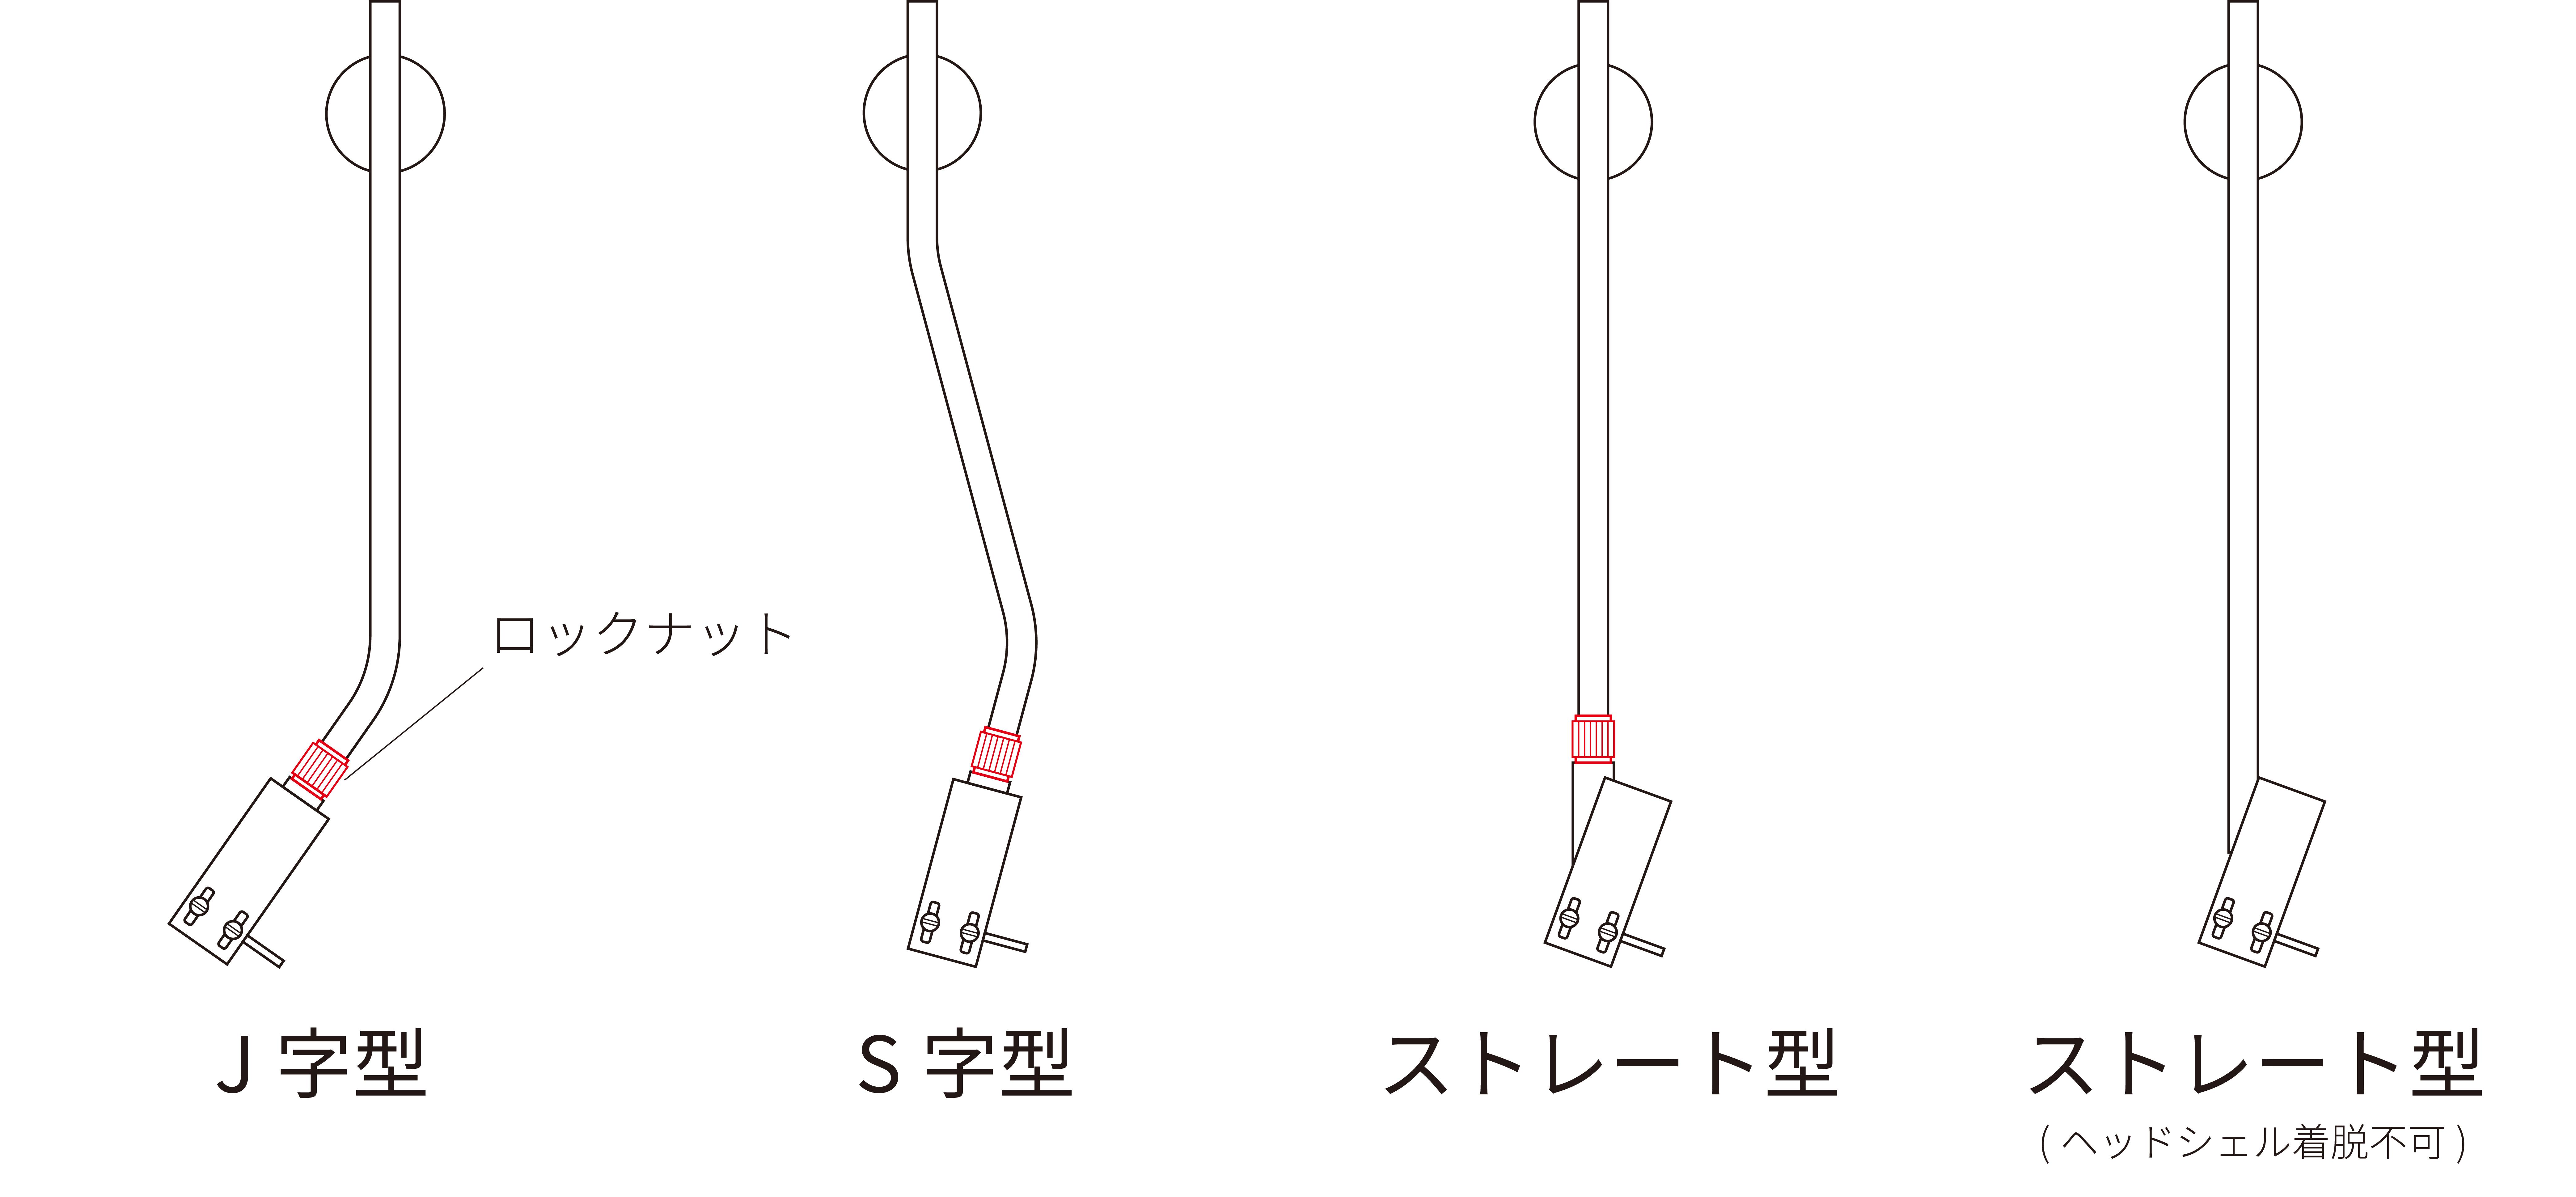
Tonearms come in several shapes, including J-shaped, S-shaped, and straight types. However, with a player featuring a “universal arm” that allows you to loosen the lock nut and remove the headshell, the cartridge can be replaced together with the headshell regardless of the tonearm shape. Replacing the entire headshell eliminates steps requiring tools, makes it possible to use a cartridge with a headshell immediately, and allows easy replacement when switching between multiple cartridges.
(Our cartridges with headshells are identified by an “H” at the end of the MP-series cartridge model number. Example: MP-100H)
※Please note that some cartridges have a structure in which the screws are inserted from below, while others have integrated bolts; because these cannot be secured due to their construction, replacing the headshell may be necessary.
※The headshells supplied with our cartridges are shaped for use with J-shaped and S-shaped tonearms. Therefore, when using our cartridges with a straight tonearm, either perform tracking adjustment by substantially tilting the cartridge section clockwise, or use the headshell for straight-type tonearms supplied with the player.
Some players, often those with straight tonearms, have an “integrated arm” in which the tonearm and headshell are integrated and cannot be detached. Even in this case, only the cartridge can be replaced if it is attached with two flat-head screws from above and four lead wires.
Please refer to the following video when replacing the cartridge.
For players in which neither the headshell nor the cartridge can be detached, only the stylus can be replaced. Please use a replacement stylus compatible with your player.
For players using the plug-in “T-4P” cartridge (P-mount), please use the “C-502M/P”.
Dash Cameras
- The main unit will not turn on
-
● Is the car charger’s LED illuminated?
The car charger may be malfunctioning. Replacement car chargers can be purchased from our website.
● If you are using a splitter adapter or similar device, disconnect it.
The splitter adapter may be malfunctioning, or the splitting may be causing insufficient power.
● Using the included USB cable and a commercially available AC-USB adapter, try powering the device without using the car charger.
If the device powers on this way, the car charger may be damaged, or power may not be flowing properly from the cigarette lighter socket.
● Can the device be started with the SD card removed?
The device may fail to start properly if an SD card that is worn out, damaged, or experiencing an error is inserted.
● Please reset the device.
The device may be frozen. The location of the reset button differs depending on the model, so please check the instruction manual. - The power turns off immediately · The power turns off by itself · Keeps restarting
-
● This product’s battery has a very small capacity.
The battery installed in this product has only enough capacity for approximately one use of Parking Mode.
Therefore, it cannot be used solely on power from the built-in battery.
When setting up or using the product, be sure to power it while connected to a cigarette lighter socket, USB power port, or other power source.
● The power automatically turns off when power supply stops.
To ensure that the main unit turns off in conjunction with turning off the engine, power supplied to the main unit stops, and the power is designed to turn off several seconds to several tens of seconds after power is no longer supplied.
● Are you using a cigarette lighter socket splitter adapter or similar device?
The split connection may be causing insufficient power, or the splitter adapter may be malfunctioning.
● Is “Power Off” turned on (set to a time other than Off)?
When this is set, the power automatically turns off if recording does not occur for the specified period.
※ The Power Off function is available only on the MDVR102HD, MDVR104FHD(SEFHD), MDVR108WDR4K(SEWDR4K), and MDVR201CPFHD.
● Try supplying power without using the car charger by using the included USB cable and a commercially available AC-USB adapter.
If the power turns on this way, the car charger may be damaged, or power may not be flowing properly from the cigarette lighter socket.
● Try operating the unit with the rear camera plug disconnected. (Models with a rear camera whose model number ends in “REAR”)
If the rear camera plug is connected or disconnected while the unit is operating, it may restart. Therefore, there may be a contact failure, such as a broken wire, in the rear camera cable, plug, or another component.
- The screen turns off by itself
-
● Is “Screen Off” turned on (with a time setting other than Off)?
When this is set, the power automatically turns off if recording does not take place for the specified period of time.
※If the screen does not turn on again when you press any button, the power itself may be turned off.
- The screen display is distorted. (Static or white screen)
-
●Are you using an SD card with the capacity and class specified in the product manual?
Using an unsupported SD card may affect the screen display. As it may cause malfunctions, be sure to use an SD card with the capacity and class specified in the manual.
※Please also avoid using bulk products or poor-quality, non-genuine products.
●Please check operation with the SD card removed.
Even with a supported SD card, if it is damaged, worn out, or experiencing errors, it may affect the screen display.
Please contact the SD card manufacturer.
Please note that SD cards have a limited lifespan, so we recommend replacing the SD card regularly.
●The device may be experiencing interference from another in-vehicle device.
Using the included USB cable and a commercially available AC-USB adapter, check operation in a location other than inside the vehicle.
Install it away from other devices, or contact the manufacturer of the device causing the interference.
- Recording does not start
-
●Is the “red circle” in the upper-left corner of the screen blinking?
The blinking “red circle” in the upper-left corner of the screen is the icon indicating that recording is in progress.
Normally, recording starts automatically immediately after startup.
●Did you format the SD card before use?
The SD card cannot be written to or read correctly unless it is formatted on the device in which it will be used.
Please check the instruction manual and format the card.
※Formatting erases all data stored on the SD card. Please back up any necessary data to a computer, device, or other medium.
●Are messages such as “Memory is full.”, “Memory error”, or “Please format.” displayed on the screen?
・If the message “Memory is full.” is displayed, the SD card has no free space remaining.
Back up any necessary files to a computer, device, or other medium, and format the card.
・If the message “Memory error” is displayed, a temporary error may have occurred on the SD card, or the SD card may be damaged or worn out.
Back up any necessary files to a computer, device, or other medium, and format the card. If this does not resolve the issue, replace the SD card or contact the SD card manufacturer.
※The messages “Memory is full.” and “Memory error” are displayed on the MDVR102HD, MDVR104FHD(SEFHD), MDVR108WDR4K(SEWDR4K), and MDVR201CPFHD.
・The message “Please format.” may be displayed when the SD card has no free space remaining, when an SD card with no data on it is recognized as a new, unformatted SD card, or when a temporary error or damage has occurred, as applicable.
Back up any necessary files to a computer, device, or other medium, and format the card.
※The message “Please format.” is displayed on the MDVR206HDREAR, MDVR301FHDREAR, MDVR304MRREAR, and MDVR306FHD.
●Are you using an SD card with the capacity and class specified in the product’s instruction manual?
→Using an unsupported SD card may affect the screen display. To prevent malfunctions, be sure to use an SD card with the capacity and class specified in the instruction manual.
※Please also avoid using bulk products, unauthorized low-quality products, or similar items.
●Please check operation with the SD card removed.
→Even a supported SD card may affect the screen display if it is defective, worn out, or experiencing an error.
Please contact the SD card manufacturer.
Please note that SD cards have a limited lifespan, so we recommend replacing the SD card regularly.
- Recording stops midway
-
●Is motion detection turned on?
Motion detection is an extended function intended for use with fixed security cameras installed in buildings and similar locations. When it is turned on, recording takes place only when something moves within the screen.
When using the device as a dashcam, be sure to set it to off.
●Are messages such as “Memory is full,” “Memory error,” or “Please format” displayed on the screen?
・If the message “Memory is full” is displayed, the SD card has no free space.
Back up the necessary files to a computer, device, or similar location, and format the card.
・If the message “Memory error” is displayed, a temporary error has occurred on the SD card, or the SD card is damaged or worn out.
Back up the necessary files to a computer, device, or similar location, and format the card. If this does not resolve the issue, replace the SD card or contact the SD card manufacturer.
※The messages “Memory is full” and “Memory error” are displayed on MDVR102HD, MDVR104FHD(SEFHD), MDVR108WDR4K(SEWDR4K), and MDVR201CPFHD.
・The message “Please format” may be displayed when the SD card has no free space, when an SD card containing no data is recognized as a new, unformatted SD card, or when a temporary error or damage has occurred.
Back up the necessary files to a computer, device, or similar location, and format the card.
※The message “Please format” is displayed on MDVR206HDREAR, MDVR301FHDREAR, MDVR304MRREAR, and MDVR306FHD.
●Are you using an SD card with the capacity and class specified in the product manual?
→Using an unsupported SD card may affect the display on the screen. Since it may cause a malfunction, be sure to use an SD card with the capacity and class specified in the manual.
※Avoid using bulk products, unauthorized low-quality products, or similar items.
●Check the operation with the SD card removed.
→Even a supported SD card may affect the display if it is defective, worn out, or experiencing an error.
Please contact the SD card manufacturer.
As SD cards have a limited lifespan, we recommend replacing the SD card regularly.
- Recording starts and stops frequently.
-
●Is motion detection turned on?
Motion detection is an extended function intended for use with fixed security cameras installed in buildings and other locations. When it is turned on, recording takes place only when something moves within the screen.
When using the device as a dashcam, be sure to turn it off.
●Please try operating the device with the rear camera plug disconnected. (Models with a rear camera whose model number ends in “REAR”)
If the rear camera plug is connected or disconnected while recording, recording will temporarily stop and then restart. Therefore, there may be a contact failure, such as a broken wire, in the rear camera cable, plug, or other component. - The messages “Memory is full” and “Please format” are displayed frequently, and recording frequently stops.
-
●Is loop recording turned on (for times other than off)?
Please check the user manual and enable loop recording.
●Did you format the SD card before use?
The SD card cannot be written to or read correctly unless it is formatted on the device in which it will be used.
Please check the user manual and format it.
※Formatting will erase all data saved on the SD card. Please back up any necessary data to a computer, device, etc.
●Are you using an SD card with the capacity and class specified in the product manual?
→Using an unsupported SD card may affect the display. To prevent malfunction, be sure to use an SD card with the capacity and class specified in the user manual.
※Please also avoid using bulk products, unofficial inferior products, etc.
●The G-sensor sensitivity may be too high.
Because the G-sensor sensitivity is too high, it may respond to normal driving, acceleration, braking, or driving on uneven roads, causing numerous files to be locked. <brPlease review the G-sensor sensitivity once again and select a sensitivity suitable for your vehicle and environment.
※MDVR301FHDREAR only has G-sensor on/off functionality and does not have a sensitivity selection function.
※Even when the sensitivity is set to the lowest level, the G-sensor may respond to impacts other than those caused by an accident, depending on the vehicle and environment. To prevent files from accumulating as a result, and to prevent errors in the SD card itself, we recommend formatting the SD card regularly.
●The parking mode sensitivity may be too high.
Because the parking mode sensitivity is too high, it may respond when doors are opened or closed, causing numerous locked files to accumulate.
Please review the parking mode sensitivity once again and select a sensitivity suitable for your vehicle and environment.
※MDVR206HDREAR, MDVR301FHDREAR, and MDVR304MRREAR only have parking mode on/off functionality and do not have a sensitivity selection function.
※Even when the sensitivity is set to the lowest level, depending on the vehicle and environment, parking mode may respond to things other than external impacts. To prevent files from accumulating as a result, and to prevent errors in the SD card itself, we recommend formatting the SD card regularly. - The rear camera image is interrupted or does not appear
-
●Are you branching the cigarette lighter socket using a splitter adapter or similar device?
The branching may be causing insufficient power.
Please plug it directly into the cigarette lighter socket without branching it.
●Are the plug inserted into the main unit and the in-line connector of the cable near the camera fully and securely inserted?
Poor contact may be occurring. Please carefully check each connection.
●Is the rear camera cable crushed, split in its insulation, or bent?
Poor contact may be occurring due to an internal wire break.
Please take great care to prevent the cable from being pinched by doors or other opening/closing parts.
Replacement rear cameras are available for purchase on our website.
- The rear camera footage has not been saved.
-
● Is the “Rear Camera” item on the settings screen turned on?
Even if the rear camera footage is displayed on the recording screen, files will not be saved if the rear camera is turned off on the settings screen.
Please check the settings.
● Is playback possible on the dashcam itself?
If data remains on and can be played back on the dashcam itself, the data has been saved correctly.
When checking the data on a computer, please note that the front camera footage and rear camera footage are saved in different files.
We are unable to provide support regarding how to use a computer. Please contact the computer manufacturer.
- The date/time and other settings are reset
-
[Introduction] The “movio” dash cameras currently available for sale do not have built-in GPS and retain the date and time using the battery built into the main unit.
●Are you branching the cigarette lighter socket using a splitter adapter or similar device?
→The branching may be causing insufficient power, or the splitter adapter may be malfunctioning.
●After setup, was the unit supplied with power (charged) for approximately 30 minutes to 1 hour?
Immediately after first opening, the battery is discharged. Therefore, if you turn off the engine and stop supplying power immediately after setup, the battery cannot store enough charge to retain the date, time, and settings, causing them to be reset.
Therefore, after the initial setup, leave the engine running for 30 minutes to 1 hour to charge the main unit. (Charging with the included USB cable and a commercially available AC-USB adapter is also fine. When charging with a commercially available AC-USB adapter, the specified current differs depending on the model, so please use one with the same value (A) indicated on the car charger.)
●If you use your vehicle infrequently (and thus supply power to the main unit infrequently), the battery may discharge before the next use.
The battery installed in the “movio” dash camera has only a very small capacity, sufficient to operate parking mode once.
Therefore, if the unit is not supplied with power for approximately 5 days to 1 week, the battery will discharge and the date, time, and settings will be reset.
The number of days until the battery discharges varies depending on the usage environment, temperature, degree of battery deterioration, and other factors. - Cannot operate the buttons.
-
●Could it be recording?
When the unit is recording, operations such as opening the menu are unavailable.
Press the OK button once to stop recording, then perform the operation.
●Could motion detection be turned on?
Motion detection is an enhanced function intended for use as a fixed security camera installed in buildings and similar locations. When it is turned on, recording takes place only when something moves within the screen.
As a result, recording may restart immediately after being stopped, leaving the unit in a state where it cannot be operated.
Either secure the unit completely so that no motion is detected, or cover the lens to make the screen completely dark, open the menu, and turn off motion detection.
●The unit may be frozen.
If the current time display and recording time have stopped, the unit may be frozen.
Press the reset button to reset the unit. The location of the reset button differs by model, so please check the instruction manual. - The main unit frequently freezes.
-
●Are you using an SD card with the capacity and class specified in the product manual?
→Using an unsupported SD card may affect the operation of the device. As this may cause malfunctions, be sure to use an SD card with the capacity and class specified in the manual.
※Please also avoid using bulk products, unofficial inferior products, and the like.
●Please check the operation with the SD card removed.
→Even if the SD card is supported, if it is defective, worn out, or experiencing errors, it may affect the operation of the device.
Please contact the SD card manufacturer.
Please note that SD cards have a limited lifespan, so we recommend replacing the SD card regularly.
Please reset it. The location of the reset button varies by model, so please refer to the instruction manual. - Immediately after startup, messages such as “Storage” and “PC Camera” appear, preventing operation.
-
●When connected to and powered by a computer, the settings switch to those for using the device as an external camera for the computer, allowing recorded data to be viewed.
When operating the device as a dashcam while powering it via the included USB cable, do not use the USB power port on the computer; use an AC-USB adapter to supply power. (When charging with a commercially available AC-USB adapter, the specified current varies by model, so use one with the same value (A) indicated on the car charger.)
●Are you powering the device using the genuine car charger and genuine USB cable included with the product?
If power is supplied using a commercially available cable, the main unit may incorrectly recognize the connection as a computer connection even when power is supplied from a cigarette lighter socket or a USB power port other than a computer.
●If power is supplied using an in-vehicle USB power port, the main unit may incorrectly recognize the connection as a computer connection.
If power is supplied using a commercially available cable, the device may incorrectly recognize it as a computer connection even when power is supplied from a cigarette lighter socket or a USB power port other than a computer.
When supplying power from your vehicle, always use the cigarette lighter socket.
- The dashcam unit does not turn off even after the engine is turned off.
-
●Power may continue to be supplied to the cigarette lighter socket even after the engine is turned off.
Power may continue to be supplied to the cigarette lighter socket even when the engine is turned off due to a malfunction of the cigarette lighter socket or insufficient insulation.
As there is a risk that your vehicle’s battery may become discharged, we recommend having it inspected by a car dealer or similar service provider.
- Multiple files with short recording times are being created · Recorded files are shorter than the time specified in the overwrite settings
-
●Could the file have been recorded by Parking Mode?
The recording time in Parking Mode varies depending on the model, but is approximately 20–30 seconds.
Please review the Parking Mode sensitivity once again and select the sensitivity appropriate for your vehicle and environment.
※MDVR206HDREAR, MDVR301FHDREAR, and MDVR304MRREAR only have the Parking Mode on/off function and do not have a sensitivity selection function.
●Motion detection is an extended function intended for use as a fixed security camera installed in buildings or similar locations. When this is enabled, the camera detects moving objects within the screen and records for approximately 20–30 seconds.
When using it as a drive recorder, be sure to set it to off.
●Please try operating the device with the rear camera plug disconnected. (For models with a rear camera whose model number ends in “REAR”)
If the rear camera plug is connected or disconnected while recording, the recording will temporarily stop and then restart. Therefore, there may be a poor connection caused by a break in the rear camera cable, plug, or similar component. - Only files from specific sections have not been saved
-
●Could motion detection be turned on?
Motion detection is an extended function intended for use with fixed security cameras installed in buildings and similar locations. When using the device as a dashcam, if this function is turned on, recording tends not to take place while waiting at traffic lights or driving on expressways and main roads where there is little change in the scenery, because movement is not detected.
When using the device as a dashcam, be sure to set this function to Off.
●Could there be files locked by the G-sensor remaining?
If the SD card has already been recorded up to its storage capacity limit and is now deleting old recording data and writing new recording data by overwriting it, the files will not be arranged in chronological order even when viewed from the oldest file. Instead, files locked by the G-sensor or parking mode will be stored mixed together with relatively new files.
Locked files display a padlock icon in the upper-left corner when thumbnails are shown on the playback screen.
※Even if an accident occurs, the recording data from the time of the accident may not be locked depending on the impact strength and the G-sensor sensitivity setting. Therefore, if there is no concern that the other vehicle will drive away and you determine that no further recording is necessary, you can stop recording itself using the OK button, preventing new recording data from being written and thereby preventing deletion by overwriting. - There are corrupted files.
-
●The SD card may be damaged or worn out.
Even when using a compatible SD card, if it is defective, worn out, or experiencing an error, recording data may not be saved correctly, or saved recording data may become corrupted.
Please note that SD cards have a limited lifespan, so we recommend replacing the SD card regularly.
●If the SD card is removed during recording, or if the power is turned off or the device restarts without the ending screen being displayed, the recording data will not be saved correctly.
When recording is stopped using the OK button, or when recording ends normally because the specified time for overwrite recording has been reached, the process of completing the writing of that data is performed last.
Therefore, if the SD card is removed during recording, or if the power is suddenly turned off or the device restarts without the ending screen being displayed, that process will not be performed, so the data may be saved as corrupted data, or the data itself may not be saved.
Be sure to turn off the power before inserting or removing the SD card.
If the power suddenly turns off or the device restarts without the ending screen being displayed, please refer to the other “Frequently Asked Questions” and resolve the problem. - Interferes with other in-vehicle equipment or is subject to interference from other in-vehicle equipment
-
●Are you using a branching adapter or similar to split the cigarette lighter socket?
Using a branching adapter or similar to share the cigarette lighter socket among multiple devices may cause interference between the devices.
Please use it by plugging it directly into your vehicle’s cigarette lighter socket without using a branching adapter.
●Are the plugs on the cigarette lighter socket side and the main unit side of the car charger inserted firmly all the way?
If there is a gap at the plug insertion point, interference is more likely to occur, so please insert it firmly all the way to minimize any gap.
●Install it farther away from the device causing interference.
Moving it farther away from the device causing interference may improve the symptoms.
- I don't understand what the icons displayed on the screen mean.
-
Models released before the MDVR201CPFHD are listed on the product introduction page, while models released from the MDVR206HDREAR onward are listed in the instruction manual.
- How can I view recorded data on a computer?
-
Connect the device to a computer using the included USB cable, then select “Storage” from the menu displayed after the device starts up. The computer will recognize it as external storage.
Alternatively, you can remove the SD card from the device and connect it using the computer’s built-in SD card slot, an adapter, or an external slot to check the data.
※Some computers may be unable to connect directly to the device due to compatibility issues. Also, the speed may be slower than the read speed indicated on the SD card, so we recommend inserting the SD card directly into the computer.
※We are unable to provide instructions on how to operate your computer. Please contact the manufacturer of your device. - What is the length of the car charger's cable?
-
Approximately 3 m for all models sold by our company.
As of December 2021 - What is the length of the rear camera cable?
-
Varies depending on the model, as follows.
MDVR206HDREAR: Approximately 6 m
MDVR301FHDREAR, MDVR304MRREAR: Approximately 7 m - The fixed holder does not securely attach to the windshield.
-
●Please thoroughly wipe off any dirt from the installation surface.
If there is oil or other residue on the installation area, it may not adhere properly.
Before installation, thoroughly wipe off any dirt from the windshield.
●After installation, have you lifted the lever on the fixing holder?
Unlike a conventional suction cup, the fixing holder is designed to adhere when the lever is lifted.
●After installation, pull the fixing holder toward you.
Pulling the fixing holder toward you once increases the vacuum and strengthens the adhesion.
●Is the suction cup installation position interfering with the black ceramic (the black dotted areas at the four corners of the windshield)?
If the suction cup is installed on an uneven area, air will enter through the gaps and it will not adhere.
Install it on a smooth area.
●It may become easier to detach due to summer sunlight or the temperature inside the vehicle.
Strong summer sunlight or a rise in the vehicle's interior temperature may cause the air inside the suction cup to expand due to the temperature change, causing it to detach.
Especially when high temperatures are expected, such as in summer, please remove and reattach it regularly.
●The adhesion may have weakened due to wear or deterioration from use.
It may no longer be able to maintain a vacuum due to wear or deterioration from use.
The fixing holder can be purchased on the website.
- The SD card is not recognized even when inserted.
-
●Are you using an SD card with the capacity and class specified in the product manual?
Using an unsupported SD card may cause the main unit to fail to recognize it. Since this may cause malfunctions, be sure to use an SD card with the capacity and class specified in the manual.
※Please also avoid using bulk products, unauthorized inferior products, or similar items.
●The SD card may be damaged or worn out.
Even if the SD card is supported, it may not be recognized correctly if it is defective, worn out, or experiencing an error.
Please contact the SD card manufacturer.
SD cards have a limited lifespan, so we recommend replacing the SD card regularly.
Action Cameras
- The main unit will not turn on
-
●Has the device been sufficiently charged?
The device will not start if it is not sufficiently charged. Please charge it using the included USB cable.
●Please press and hold the power button firmly to start the device.
To start the device, you need to press and hold the power button. Press and hold it firmly for approximately 3 seconds.
- Unable to connect to the device via Wi-Fi
-
●Has the device been sufficiently charged?
If the charge is insufficient, operation may be unstable. Please charge it using the included USB cable.
●Please confirm that you are connected to the access point “movio-M1034K” on the device’s Wi-Fi settings screen.
A message warning that the network is not connected, such as “No internet connection,” may be displayed; however, there is no problem because the camera itself does not have a cellular network connection. (This is because the device recognizes it as a “Wi-Fi router that is not connected to the internet.”)
- The app cannot be used on the device
-
●Has location permission been granted to the “M1034K” app?
The app will not start properly unless the “Location” app permission is allowed.
Normally, a pop-up requesting permission is displayed when the app is launched for the first time, but if permission was not granted at that time, it must be changed in the device’s system settings.
※We are unable to provide instructions on how to operate each device. Please contact the manufacturer of your device.
●Is the app up to date?
Please check whether the app is up to date.
On the app download page for each device, if the button says “Open” rather than “Update” or “Install,” the app is up to date.
●Please close the app once and launch it again.
If you launch the app before connecting the camera to the device and then display the app again after connecting them, the camera will not be recognized properly.
Close the app once, then relaunch it after connecting the camera and the device.
●Restarting the camera and device may resolve the issue.
A temporary issue may have occurred with the camera or device.
●Reinstalling the app may resolve the issue.
A temporary issue may have occurred with the app.
●Turning off the device’s power-saving mode and proprietary functions may resolve the issue.
If the device’s built-in power-saving mode or similar functions, or other proprietary functions, are enabled, the app may not operate properly.
Please try operating the app after turning these functions off.
●Please try connecting with another device.
A temporary issue, malfunction, or compatibility problem on the device side may be preventing use.
- In the iOS app, an error message is displayed and the captured data cannot be copied to the device.
-
●Grant the “M1034K” app permission to access “Photos”.
If permission to access “Photos” has not been granted to the iOS app, messages such as “Storage is full.” or “Please allow M1034K to access your~” may be displayed and captured data will not be saved to the device, even when there is sufficient storage space on the device.
Please configure the device settings by referring to the link below.
When videos cannot be saved from the iOS app to the device
※iOS is a trademark of Apple Inc., registered in the U.S. and other countries. - Recorded data is split even though overwrite recording is not enabled
-
●Due to the process of writing to the SD card, files are divided at set time intervals.
When data is written to the SD card, recorded data is divided at set time intervals due to limitations in writing speed and conversion-related factors.
The interval and timing at which files are divided vary depending on the performance and type of SD card.
If you want to make long-duration recorded data into one continuous file, please process it using commercially available video editing software or similar. - Can video be output to an external monitor in real time using microHDMI?
-
●It is possible, but we are unable to hide icons and other items displayed on the screen.
This product is intended for use as an action camera, so the type of use described above is an extended application.
The video displayed on the action camera screen will be output to the external monitor as is. Please note that icons, the time display, and the blank areas at the top and bottom of the screen cannot be removed.
Also, depending on the type of monitor and cable, the video may not be output correctly due to compatibility issues. Please be aware of this. - M1034K M308HMCAM The app and camera are not connecting
-
Depending on the Android device model, the WiFi connection may not be maintained and may disconnect, preventing the camera from connecting on the app’s top screen.
When connecting to WiFi for the first time, if the Android system displays a confirmation notification saying, “This network is not connected to the Internet. Do you want to maintain the connection?”, be sure to select “Yes.”
If the notification disappears or is not displayed again, delete the WiFi settings for “movio-M308HMCAM” and “movio-M1034K” from the device settings, then connect to WiFi again.
※The notification method and wording vary depending on the device model. Please contact your smartphone manufacturer for instructions on how to configure the connection to be maintained.
Also, this issue may be improved by turning on Airplane mode or turning off mobile data from the device settings screen. If you use security software for virus monitoring or other software that monitors WiFi access, turn it off while using the app, or exclude the app from monitoring. - M308HMCAM Cannot connect using the new WiFi connection password / Forgot it.
-
Camera body shutter button (page 4, 2. Detailed parts)
Press and hold it while the power is ON to hear the voice announcement “Reset complete,” indicating that all settings have been reset.
※Due to smartphone OS restrictions, please set the password to 8–10 characters. - M308HMCAM Cannot charge / Will not power on
-
This device does not support high-speed charging standards, so high-speed charging-compatible chargers such as PD, QC, and PowerIQ cannot be used.
Please use a USB-Type-A charger that does not support high-speed charging standards.If the power does not turn on, in addition to the charging issue described above, problems may occur when using a non-compliant SD card or due to SD card compatibility.
If charging or powering on is possible with the SD card removed, there may be a problem with the SD card, so please try replacing it. - The date setting is incorrect even though it was synchronized with the M308HMCAM iOS app.
-
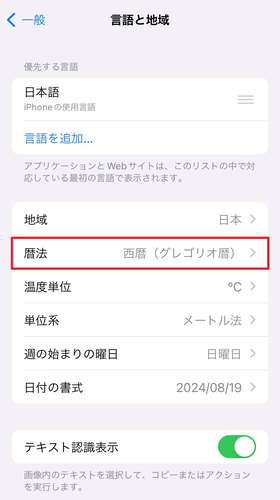
●Is your smartphone’s calendar set to the Western calendar (Gregorian calendar)?
Open the “Settings” app, select “General” → “Language & Region.” Tap “Calendar” and check “Western calendar (Gregorian calendar).”
Wireless Earphones (with Cable)
- The power won’t turn on
-
●Please try turning on the product as described in the product manual.
Magnetic-switch wireless earphones turn on when the left and right earphones are separated; other wireless earphones turn on by pressing and holding the remote control’s power button.
●Has the device been charged sufficiently?
Before use, especially immediately after opening the package, fully charge the main unit.
Be sure to use the included charging cable for charging. - Unable to charge
-
●Please try charging using a different USB power port.
The USB power port may not be supplying power properly. Also, charging via a computer may result in insufficient power, so please try supplying power with a 5V 1A AC-USB adapter.
●Please try charging using a different cable.
The cable may be broken or malfunctioning. Please try charging using another cable you have.
※The shape of the connector varies depending on the model. (microUSB cable or USB Type-C cable)
Using a commercially available cable temporarily for confirmation is not a problem, but continued regular use may cause malfunctions or damage.
If you find that the included cable is broken or malfunctioning, please purchase a genuine cable from our website and use it for charging. - Unable to pair with the device
-
●The recommended devices for using the wireless earphones we sell are smartphones and tablets.
The recommended devices for using the wireless earphones we sell are smartphones and tablets using the “iOS” or “Android” operating system.
※They may not be recognized when using older versions of each OS.
※Even devices equipped with a compatible operating system may not be recognized due to compatibility issues.
※Pairing or some functions may become unavailable following an update to the device.
When used with computers or tablet devices running an operating system other than those listed above, the earphones may not be recognized due to compatibility issues.
Operation is not guaranteed for TVs, feature phones (non-smartphones), or devices equipped with other special functions.
※We cannot provide instructions on how to operate each device. Please contact the manufacturer of the respective device.
・iOS is the name of an operating system owned by Apple Inc.
・Android is a trademark of Google Inc.
●Is the LED on the earphone flashing to indicate that it is waiting to be paired?
If it takes too long to pair after starting the earphones, they may automatically turn off, or the battery may run out and turn them off.
●They may already be connected to another device.
If a previously paired device is nearby, pairing will be performed automatically.
To pair with another device, delete the connection history from the previously paired device or turn off Bluetooth®.
●They may be experiencing interference from other wireless devices.
At stations, commercial facilities, crowded places, and similar locations, interference may occur with Bluetooth® devices used by others or other wireless devices.
Please pair the earphones while avoiding crowded locations and places with many wireless devices.
In addition, Wi-Fi may cause interference when using the 2.4 GHz band.
●Please try connecting to another device.
There may be a temporary malfunction or failure on the device side.
●Resetting the device’s network settings may resolve the issue.
On smartphones and tablets, you can reset only network settings such as Wi-Fi and Bluetooth®, without resetting the device itself.
This may resolve temporary malfunctions.
※We cannot provide instructions on how to operate each device. Please contact the manufacturer of the respective device.
※Please note that performing this operation will delete Wi-Fi access points, passwords, Bluetooth® device pairing information, and, for customers using an inexpensive SIM, the APN configuration profile installed when the line was activated; you may need to configure these settings again. (We assume no responsibility whatsoever for data deleted by this operation or for any costs incurred when reconfiguring the settings.) - No sound comes from either earbud.
-
●Is the volume set appropriately?
Please press the “+” button on the remote control, or increase the volume on the device.
●Please try playback using the genuine music app preinstalled on the device or the YouTube app.
If there is no audio only when using a specific app or service, the issue may be due to a compatibility problem, settings on the app or service side, or a malfunction.
・YouTube is a trademark or registered trademark of Google Inc.
●Do the remote control operations work?
If the remote control works but there is no audio, the cable may be broken due to pulling, bending, impact, or similar damage.
- No audio comes from one earbud / Only the audio from one earbud cuts out
-
●The cable may break due to pulling, bending, impact, or other forces.
Damage or wear caused by handling is not covered by the warranty. When using the product, be careful not to pull, bend, pinch, or subject the cable to impact or loads. - The volume is too loud
-
● Is the volume setting appropriate?
Please press the “−” button on the remote control, or lower the volume on the device.
● Please try playback using the genuine music app preinstalled on the device or the YouTube app.
If there is no audio only with a specific app or service, the issue may be due to a compatibility problem, settings on the app or service side, or a malfunction.
・YouTube is a trademark or registered trademark of Google Inc.
● Is the device recommended for operating this product?
With devices other than smartphones and tablets, and with some music players equipped with their own operating systems, volume control may not be possible.
- Unable to adjust the volume
-
●Please try playback using the genuine music app preinstalled on the device or the Youtube app.
If no audio is output only with a specific app or service, the issue is due to a compatibility problem, settings on the app or service side, or a malfunction.
・YouTube is a trademark or registered trademark of Google Inc.
●Is the device one of the recommended devices for operating this product?
On devices other than smartphones and tablets, and on some music players equipped with their own operating systems, volume control may not be possible.
- Audio cuts out or contains noise
-
●There may be interference from other wireless devices.
At stations, commercial facilities, crowded places, and other such locations, interference or signal crossover may occur with Bluetooth® devices and other wireless devices being used by others.
Please pair the devices away from crowded places and areas with many wireless devices.
In addition, Wi-Fi may cause interference if you are using the 2.4 GHz band.
●Cancel the pairing with the device once, then pair and register it again; this may resolve the issue.
There may be a temporary problem with pairing between the device and the earphones.
Delete the pairing history registered in the paired devices list in the device's Bluetooth® settings, then pair the devices again in the same way as when you purchased them. - The other party cannot hear the microphone audio.
-
●Are the microphone and earphone settings configured correctly?
Depending on the app or device, you may be able to select the earphones as the audio output destination and the microphone for input.
Please check that the product you are using is selected correctly.
●Disconnecting the pairing with the device once and pairing it again may resolve the issue.
There may be a temporary problem with the pairing between the device and the earphones.
Delete the pairing history registered in the list of paired devices in the device's Bluetooth® settings, and pair the devices again in the same way as when you purchased them.
●The speaker or earphone volume on the other party's end during the call may be too low.
Please ask them to turn up the volume.
●Please try using the device's standard phone app or a similar app.
In chat apps, voice chat within game apps, and similar applications, the microphone may not be recognized correctly due to compatibility issues.
- Cannot operate with the remote control
-
●Is this a recommended device for operating this product?
Volume control may not be possible with devices other than smartphones and tablets, or with certain music players equipped with proprietary operating systems.
●The product may become unusable due to device updates or other changes.
There have been reports of some remote-control functions becoming unavailable after updating the OS version on certain devices.
For details, please contact the device manufacturer.
- Some button-based operations (such as “Answer call”) cannot be performed.
-
● Is it possible to perform another operation using the same button?
For example, if the “Answer call” operation cannot be performed, please check whether you can use that button to “Pause/Play music.”
If this is possible, there is no problem with the product.
● It may become unusable due to device updates or other factors.
There have been reports of some remote-control operations becoming unavailable after updating the OS version on specific devices.
For details, please contact the device manufacturer.
True Wireless Earphones
- The power won’t turn on
-
●Has the case and main unit been sufficiently charged?
Before use, especially immediately after opening the package, fully charge the main unit.
Be sure to use the supplied charging cable for charging.
●Removing the left and right earbuds from the case turns them on.
Confirm that the LED indicators on the left and right earbuds flash and that the announcement “Powered on” plays. - The case cannot be charged
-
●Please try charging using a different USB power port.
The USB power port may not be supplying power properly. Also, charging via a computer may result in insufficient power, so please try supplying power with a 5V 1A AC-USB adapter.
●Please try charging using a different cable.
The cable may be broken or malfunctioning. Please try charging using another cable you have.
※The shape of the connector varies depending on the model. (microUSB cable or USB Type-C cable)
Using a commercially available cable temporarily for confirmation is not a problem, but continued regular use may cause malfunctions or damage.
If you find that the included cable is broken or malfunctioning, please purchase a genuine cable from our website and use it for charging. - The main unit cannot be charged inside the case.
-
●Are the LED indicators on both the left and right earbuds lit?
If the earbuds’ LED indicators are lit red, they are charging. When the light changes to blue, charging is complete.
※Depending on the model, the LED indicators may automatically turn off after a certain period of time.
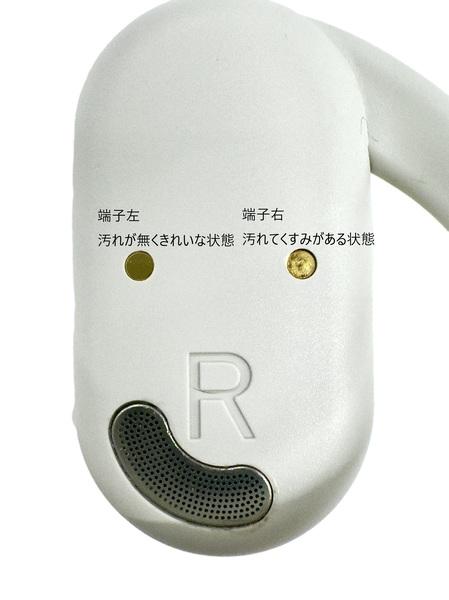
●Are the contacts between the case and the earbuds making secure contact?
The gold protrusions in the earbud compartments of the case and the gold circular holes on the backs of the earbuds serve as the contacts. Place the earbuds in the case so that these make secure contact.
●Has the case been charged?
If the case is insufficiently charged, the earbuds may not charge, or only one earbud may charge.
Be sure to fully charge the case, especially immediately after opening the package. - Neither the left nor right side can be paired with the device.
-
●The recommended devices for using the wireless earphones we sell are smartphones and tablets.
The recommended devices for using the wireless earphones we sell are smartphones and tablets running the “iOS” or “Android” operating systems.
※The earphones may not be recognized when used with older versions of each OS.
※Even devices equipped with a supported operating system may not recognize the earphones due to compatibility issues.
※Pairing or some functions may become unavailable following an update to the device.
When used with computers or tablets running an operating system other than those listed above, the earphones may not be recognized due to compatibility issues.
Operation with televisions, feature phones (flip phones), and other devices equipped with special functions is not guaranteed.
※We are unable to provide instructions on how to operate each device. Please contact the manufacturer of the device.
・iOS is the name of an operating system of Apple Inc.
・Android is a trademark of Google Inc.
●Is the LED flashing to indicate that the earphones are waiting to be paired?
When the earphones are waiting to be paired with the main unit, the LED indicator on one of the earphones flashes.
If pairing takes too long after the earphones are powered on, they may automatically turn off or the battery may run out.
※Which earphone’s LED flashes, right or left, varies by model. If the LEDs on both earphones are lit, the left and right earphones may not be paired with each other.
●They may already be connected to another device.
If a device that has been paired previously is nearby, pairing will be performed automatically.
To pair with another device, delete the connection history from the device previously paired with, or turn Bluetooth® off.
●They may be experiencing interference from other wireless devices.
At stations, commercial facilities, crowded places, and similar locations, interference may occur with Bluetooth® devices used by others or with other wireless devices.
Please pair the earphones away from crowded places and locations with many wireless devices.
Wi-Fi may also cause interference when using the 2.4 GHz band.
●Try connecting to another device.
The device may be experiencing a temporary malfunction or failure.
●Resetting the device’s network settings may resolve the issue.
On smartphones and tablets, you can reset only network settings such as Wi-Fi and Bluetooth®, without resetting the device itself.
This may resolve a temporary malfunction.
※We are unable to provide instructions on how to operate each device. Please contact the manufacturer of the device.
※Please note that performing this operation will delete Wi-Fi access points, passwords, Bluetooth® device pairing information, and, for customers using an inexpensive SIM, the APN configuration profile installed when the line was activated; various settings may need to be configured again. (We cannot accept any responsibility whatsoever for data deleted by this operation or costs incurred in reconfiguring the settings.) - Unable to pair on one side only
-
● If the LED indicators on both the left and right earbuds are flashing before pairing with the device, the left and right earbuds have not been paired with each other.
True wireless earbuds must first be paired with each other, and then paired with the device.
Normally, the left and right earbuds are paired automatically after startup; however, if automatic pairing no longer occurs, the earbuds need to be reset.
※ The reset method differs depending on the model, so please refer to the manual for your product.
※ Once resetting the earbuds is complete, delete the pairing history registered in the list of paired devices in the device’s Bluetooth® settings, then pair them again as you did when you purchased them.
● When removing the earbuds from the case, make sure that both earbuds have started up properly.
Confirm that the LED indicators on both the left and right earbuds are flashing and that the announcement “Power on” is played.
If the power does not turn on, the earbuds may not have sufficient charge, or the contacts may not be touching and the earbuds may not be charging properly.
● There may be interference from other wireless devices.
At stations, commercial facilities, crowded places, and similar locations, the earbuds may experience signal interference from Bluetooth® devices or other wireless devices being used by others.
Pair the earbuds away from crowded places and locations with many wireless devices.
In addition, Wi-Fi may also cause interference when using the 2.4 GHz band. - No sound comes from either earbud.
-
●Is the volume setting appropriate?
Please press the “+” button on the remote control or perform the operation to increase the volume on the device.
●Please try playback using the genuine music app preinstalled on the device or the YouTube app.
If no audio is produced only with a specific app or service, the issue may be due to compatibility, the app or service’s settings, or a malfunction.
・YouTube is a trademark or registered trademark of Google Inc.
- No sound is coming from one of the earbuds
-
●Could the LED indicator on the earbud that cannot be heard be flashing in pairing standby mode?
It is possible that the left and right earbuds themselves have not been paired. After confirming that the left and right earbuds are paired, pair them with the device.
※For details, see “Unable to pair only one side.”
●Try playback using the genuine music app preinstalled on the device or the YouTube app.
If there is no audio only with a specific app or service, the issue may be one of compatibility or settings or a malfunction on the app or service side.
・YouTube is a trademark or registered trademark of Google Inc.
- The volume is too loud
-
● Is the volume setting appropriate?
Please press the “−” button on the remote control, or lower the volume on the device.
● Please try playback using the genuine music app preinstalled on the device or the YouTube app.
If there is no audio only with a specific app or service, the issue may be due to a compatibility problem, settings on the app or service side, or a malfunction.
・YouTube is a trademark or registered trademark of Google Inc.
● Is the device recommended for operating this product?
With devices other than smartphones and tablets, and with some music players equipped with their own operating systems, volume control may not be possible.
- Unable to adjust the volume
-
●Please try playback using the genuine music app preinstalled on the device or the Youtube app.
If no audio is output only with a specific app or service, the issue is due to a compatibility problem, settings on the app or service side, or a malfunction.
・YouTube is a trademark or registered trademark of Google Inc.
●Is the device one of the recommended devices for operating this product?
On devices other than smartphones and tablets, and on some music players equipped with their own operating systems, volume control may not be possible.
- Audio cuts out or contains noise
-
●Please try playback using the genuine music app preinstalled on the device or the Youtube app.
If no audio is output only with a specific app or service, the issue is due to a compatibility problem, settings on the app or service side, or a malfunction.
・YouTube is a trademark or registered trademark of Google Inc.
●Is the device one of the recommended devices for operating this product?
On devices other than smartphones and tablets, and on some music players equipped with their own operating systems, volume control may not be possible.
- The other party cannot hear the microphone audio.
-
●Are the microphone and earphone settings configured correctly?
Depending on the app or device, you may be able to select the earphones for audio output and the microphone for input.
Please check that the product you are using is selected correctly.
●Cancel the pairing with the device once, then pair and register it again; this may resolve the issue.
There may be a temporary problem with pairing between the device and the earphones.
Delete the pairing history registered in the paired-device list of the device’s Bluetooth® settings, then pair the devices again in the same way as when you first purchased them.
●The speaker or earphone volume on the other party’s end during the call may be too low.
Please ask the other party to turn up the volume.
●Please try using the device’s standard phone app or a similar app.
In chat apps, voice chat within game apps, and similar services, the microphone may not be recognized properly due to compatibility issues.
- Button operation is not possible
-
●Is this a recommended device for operating this product?
On devices other than smartphones and tablets, or on certain music players equipped with proprietary operating systems, volume control may not be possible.
●The product may become unusable due to device updates or other changes.
There have been reports of cases in which some remote control functions became unavailable after updating the OS version on certain devices.
For details, please contact the device manufacturer.
- Some button-based operations (such as “Answer call”) cannot be performed.
-
●Is it possible to perform another operation using the same button?
For example, if the “Answer call” operation cannot be performed, please check whether “Pause/Play music,” which uses that button, can be performed.
If this is possible, there is no problem with the product.
●It may become unusable due to a device update or other changes.
There have been reports of some remote-control operations becoming unavailable after updating the OS version on specific devices.
For details, please contact the device manufacturer.
- The device cannot be charged while inside the BT832OWS case
-
If moisture such as sweat or rain is left on the charging terminals, rust or sebum residue may adhere to the terminals, causing poor contact and preventing charging.
If charging cannot be performed, dry-wipe the charging terminals with a cotton swab or similar.
After use, if moisture is present on the earbuds, completely wipe it off before storing them in the case.